Now that we have our relationships all set up creating usable edit forms in MS Access 2007 is ludicrously easy.
Creating an Edit Form in MS Access in Four Satisfying Steps:
- Open Beer, Open Access Project
- Highlight the table for which you want to create a form (let's start with Cities)
- Click the Create Tab, Select Form
- Press Save, Sip Beer
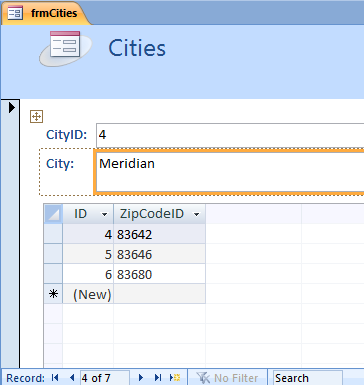
I'm not kidding. It is that easy. Here's my form (sips beer)
Repeat four steps for ZipCodes:
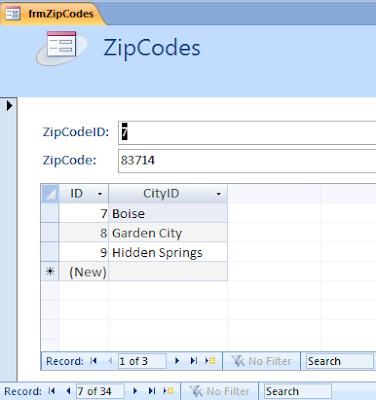
Wow! We are amazing. What else is there to do? (sips beer)
And that's the problem here, we're just sitting around sipping beer. This isn't real data. Well, it is real data, but it's a tiny little subset. Seven cities, seven zipcodes and nine relationships is not the real world. The real world has complexity.
In the real world Atlanta has 113 zip codes. In the real world the USPS recognizes twelve distinct Atlantas. And there's two in Georgia. Were you thinking Fulton or Dekalb county?
So let's get some real data. Since bafflingly the USPS doesn't give zip code data away I had to do some searching for a zipcode database. I found a text file at PopularData.com that's "a few years old" but will work for this demo. Kudos. Thanks for making free what should be free, can we get a Wikipedia project going on this? Quick everyone go visit PopularData.com and click some ads... and send hate mail to the Postmaster General.
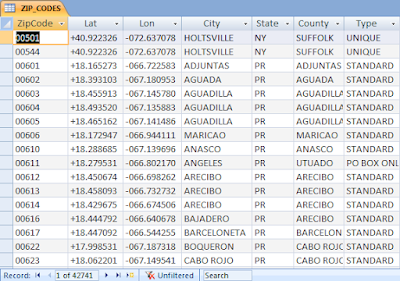
Our new text file when imported to MS Access looks like this (snippet of all 42,741 of them):
Running a quick summation query...
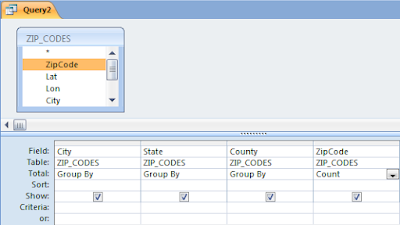
SELECT ZIP_CODES.City, ZIP_CODES.State, ZIP_CODES.County, Count(ZIP_CODES.ZipCode) AS CountOfZipCode
FROM ZIP_CODES
GROUP BY ZIP_CODES.City, ZIP_CODES.State, ZIP_CODES.County;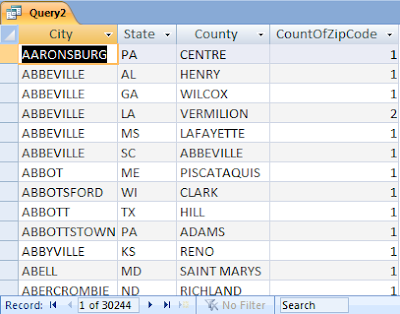
We find we have 30,244 unique cities... that is provided my assumption that there are not two towns in the same state and county with the same name is correct. Well, it that isn't correct it's their own fault (sips beer).
Now that we have this data, I feel a need to normalize it first. Since, y'all are old hats at this I'll go do the normalizing and just report back the database diagram. Hold on...
... We're back!
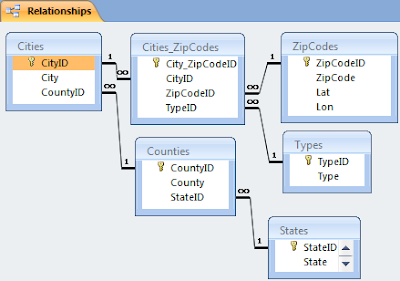
Sorry, that took a little longer than I expected, I had to go out to batchgeocode.com and fix 153 locations without latitudes and longitudes. As you can see I made a few changes. The text file we started with was fabulous for reporting, but not maintainable for data editing and relationships, so we had to do a little moving around. Don't worry, it won't be the last time. For the moment though I'm pretty happy with it. Now let's try those forms again.
First we need to setup some new lookups in the table designs for the new relationships.
- In the Cities table add a lookup for CountyID
- In the County table add a lookup for StateID
- In the Cities_ZipCode table add a lookup for TypeID
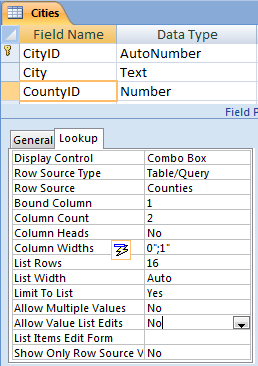
With that done it's time to lay back and let MS Access do the work. You remember the steps:
- Open Beer, Open Access Project
- Highlight the table for which you want to create a form (let's start with Cities)
- Click the Create Tab, Select Form
- Press Save, Sip Beer
Beautiful, we have a new Cities form with our brand new design behind it. Time go polish off the rest of that six-pack. Or maybe not.
You were feeling pretty good about yourself until you realized that almost every state in the union has a Washington County. There's 31 of them to be exact.
I'd call this form less than useful:
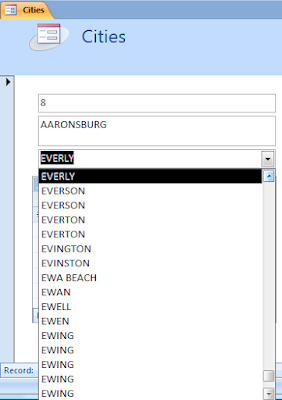
There's five Ewing counties! With no idea of which is in which state. I think we can do better.
Let's make a query that displays both County and State. Then let's switch our lookup to view this query. This won't be enough to save this 3,230 record drop-down, but it is a good practice for more moderate lists under a couple hundred records.
First, make a new query titled VU_Counties. You can use the following SQL or match what I have in design view:
SELECT Counties.CountyID, [County] & " (" & [State] & ")" AS Name
FROM States INNER JOIN Counties ON States.StateID = Counties.StateID
ORDER BY [County] & " (" & [State] & ")";
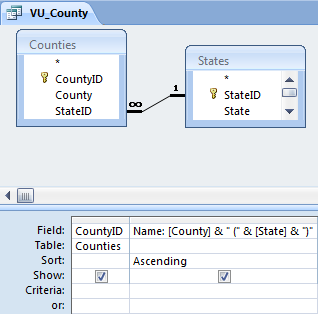
Now go back to the Lookup for the Counties table and switch the data source to your new query, VU_Counties.
Time for our four favorite steps!
- Open Beer, Open Access Project
- Highlight the table for which you want to create a form (let's start with Cities)
- Click the Create Tab, Select Form
- Press Save, Sip Beer
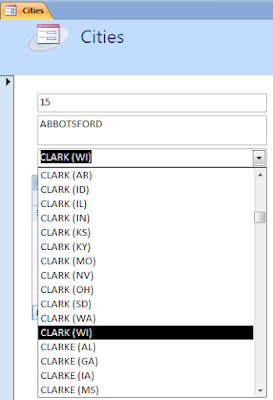
Well, that's better. It'll probably work for a while. But I have three more beers in this six pack so I might as well keep "improving" this form (does the sprinkler fading into the robot).
I see two main problems with this form:
- You can't find the data you want to edit with 30,243 cities to choose from
- Once you find your city, editing the county is still a nightmare
STEP 1: Filtering your data
The Hack
MS Access has the beautiful filter tools built in. To jump to filter by any column in a table on the Home tab look for the Sort & Filter fieldset. Click Advanced and then choose Filter by Form. This will give you a table or form that mirrors the data your were just viewing. Enter parameters to filter the data, and then press the Toggle Filter button in the Sort & Filter fieldset.
Some examples:
- Entering CENTERVILLE in the City filed (in the table or form) will limit the display to the cities with this name that the USPS recognizes.
- Entering LIKE "*(HI)" in the Counties field will filter the results to cities in Hawaii
For Real People
While those options are great, I've discovered that the average user does is not pleased working with filters. We have to give them something more obvious. This google thing is pretty popular, let's try to model our approach on that.
- Open your Cities form and switch to Design View
- Select the Textbox tool and drag a box in your header for users to type in the city they want to find.
 Open the Property Sheet by right-clicking and choosing Properties or selecting the Property Sheet button in the far right of the Design tab. Change the name of your textbox to txtSearch.
 - Now add a button next to your textbox. Name it cmdSearch.
- In the Properties Sheet for cmdSearch, switch to the Event tab and for the On Click event change the drop-down to [Event Procedure].

- Now double-click the ... button next to [Event Procedure]. This will open the VBA Editor. Welcome to programming! Your cursor will fall inside what is called a subroutine. This subroutine executes when the button you just created is clicked. We want the button to requery the dataset behind our form based on what is in the textbox. You want your screen to look like this:
Option Compare Database

Private Sub cmdSearch_Click()
Me.RecordSource = "SELECT * FROM [Cities] WHERE [City] LIKE '*" & txtSearch.Value & "*';"
Me.Requery
End Sub - Save and close the VBA Editor
Congrats you've built in search functionality. Lookout Sergey and Larry!
STEP 2: Making Editing Bearable
I still think our County drop-down could use some work. I propose we add a State dropdown above it that filters the list by State to ease picking a county and remove the problem with duplicates.
Like we added the textbox and buttons in the last step, switch to design view and drag a combobox onto the form. This will start a wizard, follow along.
- Accept the default values choice I want to look up the values in a table or query. and click Next Choose the table States and click Next
- Add StateID and State and click Next
- Choose to sort the State column Ascending and click Next
- Accept the default values to hide the key column and click Next
- Accept the default to Remember the Value for Later Use and click Next
- Change the name to State and click Finish
Now select the combobox and use the arrow keys to move it above the Counties field.
Finally, we need to add some action.
- We need to add to our VU_Counties query the StateID. Open the query in Design View and drag and drop StateID from the States table to the query results at the bottom. Close and save
- In Design View of your Cities form select the State dropdown and open the Property Sheet.
- In the After Update Event, select [Event Procedure] and click ...
- In the VBA Editor add the following code:
Private Sub State_AfterUpdate()
   Me.CountyID.RowSource = "SELECT [CountyID], [County] FROM [VU_Counties] WHERE ([StateID] = " & cmboState.Value & ") ORDER BY [County];"
   Me.CountyID.Requery
End Sub - Save and close the VBA Editor
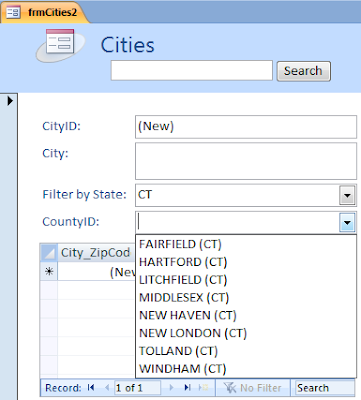
Test your code. This is far more usable. I still see room for improvement, but at least your users won't lynch you. And if you were following along it's time for beer number six.
Comments